

Furnace Maintenance 101: A DIY Guide
Are you paying high maintenance fees for your furnace?
With a bit of knowledge and elbow grease, you can do some of that maintenance on your own.
DIY furnace maintenance doesn’t replace professional inspections and repairs, but it can extend the life of your furnace, reduce the number of service calls to your home, and ultimately save you money.
Here, we list some easy tips for DIY furnace maintenance that can keep your furnace purring like a contented kitten.
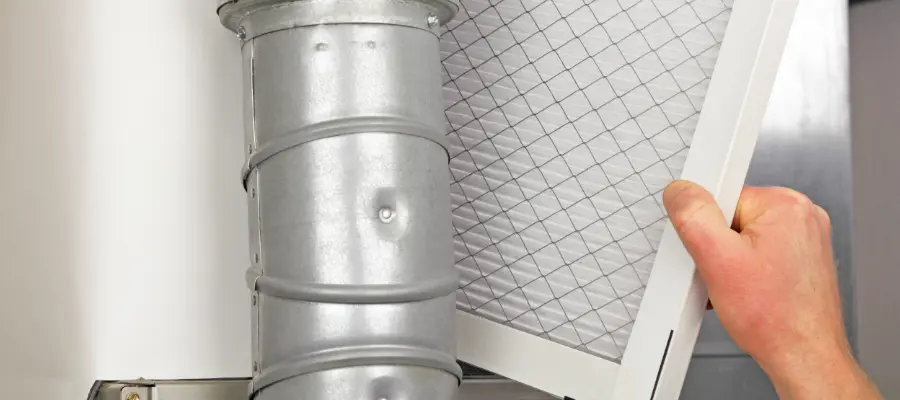
1. Replacing the Air Filter
Air filters are like the lungs of your furnace. They ensure better air quality in your home and prevent dust and debris from clogging up the works. Keeping your filter clean is a vital (and easy) part of maintenance.
- Locate your filter. Usually, it’s inside the furnace or the air return duct.
- Slide out the old filter. Pay attention to the arrows on the edge of your filter, which indicate the airflow direction.
- Insert your new filter, making sure the arrows point toward the furnace.
- Write the replacement date on the filter’s side as a reminder. Filters should be replaced every 1-3 months, depending on use and type of filter.
Speaking of types, here are the most common filter options:
- Disposable Fiberglass: Cheap and disposable, these do the job but need to be replaced every month.
- Pleated Allergen Reduction: A bit pricier, but great for reducing allergens and can last up to 3 months.
- Washable Electrostatic Filters: These are the most expensive filters but can be washed and reused for years, making them eco-friendly.
2. Cleaning Vents & Ducts
Keeping your vents and ducts sparkling clean isn’t just about having a neat home. It’s about ensuring your furnace can breathe easily and operate efficiently. Dust, pet hair, and other little nasties collecting in your venting system can block airflow, forcing your furnace to work harder and consume more energy.
- Locate all vents on your floors, walls, and ceilings.
- Unscrew the vent covers. Some might be stubborn, but a gentle nudge should do the trick.
- Take out your trusty vacuum cleaner and suck up all the dust and debris from the vent opening and surrounding area. For ducts, use a hose extension to reach inside as far as possible.
- Use a stiff brush to loosen stubborn dirt, and then vacuum again.
- Give those vent covers a good bath in warm, soapy water. Let them dry completely before screwing them back on. Skipping this step can lead to a musty smell. Eeew!
- Every few years, call in a pro to clean your ducts thoroughly. They have the tools to do a deep clean and keep your system in shape.
3. Checking & Calibrating the Thermostat
Here’s how you can do a basic thermostat check and calibration at home:
- Using a separate room thermometer, compare the room temperature with the reading on your thermostat. If there’s a significant difference, your thermostat might need calibration.
- Remove the thermostat cover and check for any obvious issues. These could include dust build-up or loose wiring, which you can clean or tighten yourself. It might be time to call a professional if you spot any damage.
- The ice test is a simple at-home calibration test. Fill a glass with ice and water, then submerge a thermometer. After about three minutes, the thermometer should read around 32 degrees Fahrenheit. Hold the thermostat sensor (inside the thermostat) in the ice water and check if it reads the same. If not, you’ll need to recalibrate your thermostat.
- Calibrating the thermostat can be tricky as the process varies across different models. Generally, you’ll need to adjust a small calibration screw inside the thermostat. Check your owner’s manual for specific instructions, or look up your model online.
DIY maintenance should complement and not replace professional servicing. If you’re unsure about any steps or notice any issues with your thermostat, call the experts to ensure your heating system functions optimally.
4. Lubricating Moving Parts
Lubricating moving parts minimizes friction, reduces wear and tear, and makes your furnace more efficient. It also reduces those irritating, squeaky noises that can drive you up the wall!
You’ll need a high-quality oil that can withstand high temperatures (your local hardware store can help). Never use WD-40 on furnaces; it’s not designed to handle the heat.
- Locate the oil ports. These are usually on the blower’s motor. You’ll likely find two ports, one on each end of the motor.
- Remove the caps on the oil ports. You might need a wrench, but sometimes a good twist will work them loose.
- Apply two or three drops of oil to each port. Don’t overdo it — too much oil can cause other problems.
- Replace the caps and make sure they’re secure.
Not every furnace has oil ports. Many modern, high-efficiency furnaces are sealed and don’t require lubrication. If unsure, check your owner’s manual or consult a professional.
5. Inspecting the Blower Assembly
The blower assembly circulates warm air from the furnace. Here’s how to inspect and clean it:
- Make sure your furnace is off and unplugged.
- The blower assembly usually sits behind the front panel of your furnace. You might need a screwdriver to remove the panel.
- Take a careful look at the blower assembly. You’re checking for any dirt, dust, or debris that might have built up over time.
- Use a soft brush or a vacuum with a brush attachment to clean the blower assembly. Be gentle — you don’t want to damage anything.
- Pay extra attention to the fan blades, as dirt can build up and affect performance.
- Once you’ve got it looking spick and span, replace the panel.
- Plug your furnace back in and give it a test run. If it operates smoothly and quietly, give yourself a pat on the back for a job well done!
6. Maintaining the Pilot Light & Burner
Your pilot light and burner are the superstars of your furnace, doing the heavy lifting. Keeping them clean and properly adjusted is crucial for efficient combustion.
- Start by turning off and unplugging your furnace.
- Remove the front panel of your furnace to access the pilot light and burners.
- Your pilot light should burn blue and steady. If it’s yellow, flickering, or difficult to light, it might be time to clean or adjust it.
- Use a wire brush to clean the pilot light and remove debris. Be careful not to apply too much pressure and damage it.
- The burners need a good clean, too. Use a vacuum to remove any dust or dirt. You can also use a soft brush or cloth, but be gentle.
- When you adjust the burner flame, aim for a primarily blue color, perhaps a yellow tip. Your furnace’s manual should have specific instructions for this step.
- Replace the panel and plug your furnace back in.
7. Checking for Carbon Monoxide
One potential hazard to watch closely is carbon monoxide (CO). It’s a colorless, odorless, and tasteless gas that can put you and your loved ones in real danger.
CO poisoning can cause flu-like symptoms, confusion, and even death in high concentrations. This is why it’s so critical to perform regular checks for carbon monoxide leaks from your gas furnace.
- Install a carbon monoxide detector in your home. If you don’t have one already, go and get one — they’re available at most hardware stores and are super easy to install.
- It’s as simple as fixing the detector to your wall and checking it regularly. Remember to change the batteries every six months because a dead sensor won’t save anyone.
- If your detector ever goes off, don’t ignore it — evacuate your home immediately and call the professionals.
Call West Coast Chief for Annual Inspections in Los Angeles
DIY furnace maintenance should never substitute for annual inspections by a certified HVAC pro. Beyond the simple maintenance tasks described above, a professional technician can catch any potential issues, replace worn or broken parts, improve efficiency, and extend the life of your furnace.
For all your heating needs in metro Los Angeles and Orange County, trust West Coast Chief Repair to keep you cozy all winter long.
- We offer same-day service in most cases.
- We provide complete HVAC services, including ductwork.
- All Chief technicians are licensed, certified, bonded, insured, and experienced.
- We’re open six days a week and can provide service after hours for emergencies.
- We guarantee our work and honor all manufacturer warranties.
Call us today. 888-832-3599.
Frequently Asked Questions about DIY Furnace Maintenance
Q: What are the essential DIY furnace maintenance masks?
A: Key tasks include replacing filters regularly, cleaning vents and ducts, inspecting the burner flames, lubricating moving parts, and checking the thermostat. These tasks help ensure proper airflow, combustion, and overall efficiency.
Q: How often should I replace the furnace filter?
A: Replace or clean the furnace filter every 1-3 months, depending on factors like filter type, household conditions, and usage. A dirty filter can impede airflow and strain the system.
Q: Can DIY maintenance replace professional servicing?
A: DIY maintenance complements but doesn’t replace professional servicing. Annual professional inspections and servicing are critical for identifying complex issues, ensuring safety, and extending the furnace’s lifespan.
Q: Is it safe to perform DIY maintenance on a furnace?
A: Yes, as long as you adhere to basic safety practices. Always turn off and unplug the furnace before performing any maintenance. For more complex tasks, call a professional.
Q: What’s the purpose of a pilot light in a furnace?
A: The pilot light is a small flame that ignites the burners in a gas furnace. It needs to burn blue and steady for the furnace to function efficiently.
Q: What signs should I look for to know if my furnace needs professional servicing?
A: If your furnace is making unusual noises, not heating correctly, constantly cycling on and off, or if the pilot light is yellow instead of blue, it’s time to call a professional.
Q: How often should I get my furnace serviced by a professional?
A: We recommend annual inspections to ensure your furnace operates safely and efficiently.
Q: What precautions can I take to avoid carbon monoxide poisoning?
A: Install a carbon monoxide detector in your home and check it regularly. If it ever goes off, evacuate your home immediately and call the professionals.
Q: How can I improve the efficiency of my furnace?
A: Regular DIY maintenance, including cleaning the vents and ducts and replacing the filter regularly, can significantly improve the efficiency of your furnace.
Q: How does a furnace work?
A: A furnace heats air and uses a blower motor and ducts to circulate the warm air throughout your home. It controls the process using a heat source (natural gas, propane, or electricity), a heat exchanger, and a thermostat.
More Articles
0 Comments